Irfanview - The Great Little Image Utility With the Funny Name
The first tool addresses the issue of image management. The scenario I will address as an example is this one. You have your design, the client gives you a disk or sends you several emails of various pictures to use, usually full size digital camera or scanned images. Now comes the task of re-sizing and optimizing these images to work in the website. If there are a large number of images involved, this is a time consuming and repetitive job that I hate to bill to my clients at full rate. There area number of shortcuts, but they usually yield less than optimal quality and dependability. The solution? Irfanview (pronounced ear-fan-view). The powerful little program with the funny name. Below is a list of some of Irfanviews many functions.
* Many supported file formats (the list is too long to include here.)
* Multi language support
* Thumbnail/preview option
* Paint option - to draw lines, circles, arrows, straighten image etc.
* Toolbar skins option
* Slideshow (save slideshow as EXE/SCR or burn it to CD)
* Show EXIF/IPTC/Comment text in Slideshow/Fullscreen etc.
* Support for Adobe Photoshop Filters
* Fast directory view (moving through directory)
* Batch conversion (with image processing)
* Multipage TIF editing
* File search
* Email option
* Multimedia player
* Print option
* Support for embedded color profiles in JPG/TIF
* Change color depth
* Scan (batch scan) support
* Cut/crop
* IPTC editing
* Effects (Sharpen, Blur, Adobe 8BF, Filter Factory, Filters Unlimited, etc.)
* Capturing
* Extract icons from EXE/DLL/ICLs
* Lossless JPG rotation
* Unicode support
* Many hotkeys
* Many command line options
* Many PlugIns
* Only one EXE-File, no DLLs, no Shareware messages like "I Agree" or "Evaluation expired"
* No registry changes without user action/permission!
* and much much more
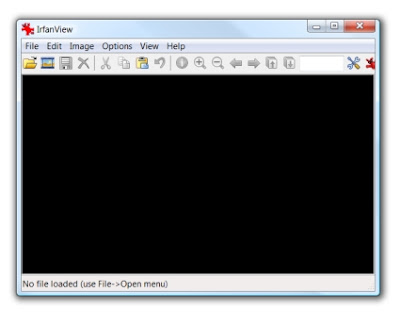
To be honest I have never found the time to explore all of Irfanview's capabilities,but the ones I have tried worked well. Today I will be discussing using batch processing to take the clients picture files and convert them to use in a website. I create a directory, usually with 'websize' in the name and then open Irfanview. When you first open Irfanview you are presented with a simple user interface, with a screen for single images or movies.
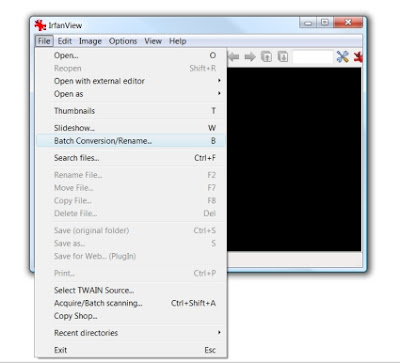
On the file tab in the menu, you select 'Batch Conversion/Rename' or you can just press the B key on your keyboard. You will be presented with the dialog shown below.
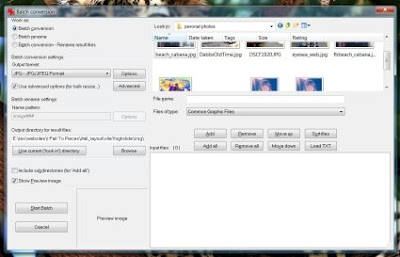
Choose Your Files and Output Directory - On the right side of the dialog is where you can navigate to the working directory and choose the files you wish to work on. You can do the selecting and sorting in this dialog or you can just open a folder and select and drag and drop the files you want to work with into the bottom left box on the dialog. To preview files you have added in the box, just select a file and it will appear in the image preview box on the left if you have the Show Preview image box checked. Or you can just press the P key on your keyboard. In this interface you can also move the files around or autosort them by different parameters to get them in order for serializing. By default Irfanview works from top to bottom.
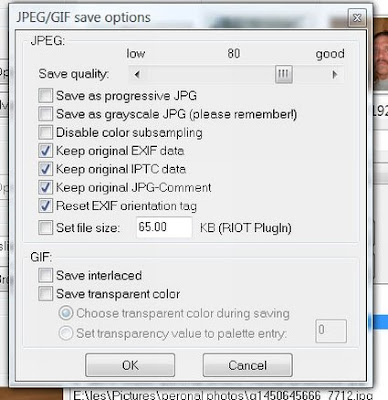
Conversion Settings - On the left, under 'Batch conversion settings' you can set the Output format using the dropdown. Once you have selected your format you can click on the 'Options' button and you will be presented with choices specific to that format (jpeg/gif options shown below).
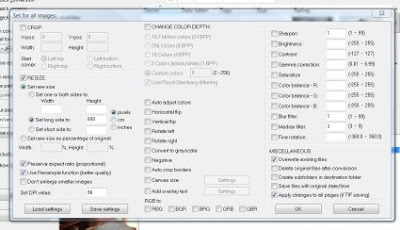
If you have selected a rename option in the 'Work as' section that will activate the 'Batch rename settings input. You can enter a name and then click on the options button which will show you the various settings you have available. It is all pretty self explanatory. One of my favorite features here is the ability to replace text in a file name - handy for versioning. Other than that, on the file management side, I usually have created a directory for the output and select Copy original/input files to output directory. I imagine most people would make the choice to keep the originals.
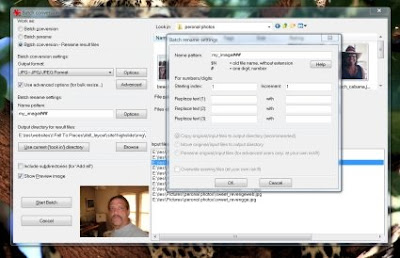
This brings us to the final choice in this flow, selecting the output directory. You can choose to input a directory manually (who does that anymore?), use the current directory (default),or Browse to choose your output directory.
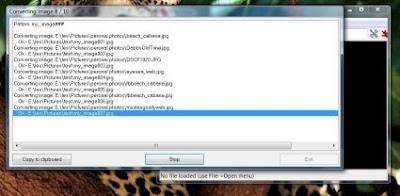
With your images all loaded and sorted and all of your output options and your output directory select you are now ready to go. "Start Batch" or the S key on your keyboard and watch Irfanview work. The first time you do this you will be amazed at how fast it is. It reports its output as it goes and lists whether each conversion went okay and it gives a a little summary of files, errors and warnings at the end.
That is basic file conversion on Irfanview. I have used this utility for years and is has saved me untold man hours in putting together web projects. I also do photography and use it for renaming and optimizing proofs, renaming files for submission to editors and other task. As I mentioned before, Irfanview is free for non-commercial use and a license for commercial use is currently only USD $12.00, quite a bargain and well worth it to support Irfan Skiljan in his efforts to continue enhancements and improvements. This utility works on all current versions of windows, even 64 bit Vista. You can obtain Irfanview at http://www.irfanview.com/ .
Example: I have posted a couple of images for you to compare. The first if for the original image, a web image at 114 kb and the second is the same image, resized and optimized with Irfanview to 51k. You can view them in different tabs on your browser to compare or download them for comparison. This will give you and idea of the quality you can get with Irfanview.
Original
Optimized


0 comments:
Post a Comment