
Back in March I published a post entitled 'My Kentico Design Workflow". I did this just to show an example of one designer's workflow with Kentico and the thinking behind it. I have decided to go into a little more detail on this, and actually show how some of the features in Kentico work in a design workflow. I also decided that screencasts would be the best way of doing this.
So I have started a series of screencasts that go over porting an HTML design into Kentico CMS. So far I have three of these screencasts done. I recorded these using Tech Smith's program Jing. I uploaded them to screencast.com. I like their format better than YouTube or Google Video. You can also find these on YouTube.
Part One of the series covers taking a complete HTML design with page code and CSS and creating a Master template while preparing for creation of page templates, navigation ,web part containers and transformations.
Part Two covers preparing the CSS and placing it in Kentico and getting it assigned to your site.
Part Three covers creating the page layout for the inner page templates and adding pages to the site using the layout.
There are three so far and I will have more coming soon. For now I am keeping them brief, under five minutes. I would love to hear what everyone thinks of these as this is a new sort of endeavor for me.
If you like these, stay tuned - there will be more.....
Saturday, December 19, 2009
Thursday, December 10, 2009
"Hybriding" in Kentico
In this article I will introduce a new approach I have been using in Kentico configurations. This particular case involves a slider I configured for the LiveAir Networks site. The task seemed pretty straightforward in the web 2.0 world. I wanted to create a billboard banner for a home page that rotated through slides that included photos, graphics text and an action button. Of course, the site is in Kentico CMS and best practices would dictate that the slides be editable and configurable and html text would be nice for SEO. The first option that came to mind was data driven flash. I have done a similar thing with xml datadriven flash - http://tinyurl.com/ycvnpw6 . My problem in this case is that the client wanted to avoid Flash for a variety of reasons. The next option I looked at was one of the really nice sliders available in the MooTools or JQuery library. The problem with this approach would be making it easily editable by the user. After some serious brainstorming I came up with an approach which I will dub"Hybriding". In this approach I used native Kentico Webparts, CSS and Graphics to produce the results. What I am about to explain is how I ended up with the banner that went on the site's home page - http://tinyurl.com/liveair.

[screenshot of page]
The Web part I chose for this task was the Scrolling Text Web part. That may sound confusing, since there are graphics in this configuration. The reason I chose this over the image slider was to have easily editable text. It is possible to configure this control to any size you want, so all I had to work out was getting the photo image and the action button in. I configured the Web part to show the Document type CMSArticle, the reasons for that will become apparent. I knew what size the container had to be so I wrote a Custom Transformation which I named CMS.Article.ScrollingPreview and a Web part container which I named Banner
Slider.
I took a look at the code for the default Article transformation:
Then in the CMS Site Manager I built the new one:
As you can see to get the photo graphic in I use an outer div with a background image which I pulled as the Article Teaser Image. I used inline style for this so that I could put the macro in the style - I wasn't sure this would work, but it did. Now the user can edit the image. Of course I had to build special images with white space for the text to fall on to with a nice fade effect. Next comes an inner div to hold the title and text, all of which get their styling from the CSS already in place. The CSS for the transformation is:
One sneaky thing I did was using the Teaser text of the Article for the text in the body of the slide and the
Article text for the text in the button, wrapping it in the buttonimg div to make it an action button. Now the
client has a slider that they can edit the text, image and button text on from an easy form interface and easily
add slides from the CMS desk. How cool is that!

To hold it in place and give it a border a simple Web part container containing this div id:
All set!
Later I will do a post on a "hybrid" control using the native Kentico repeater wrapped in some Mootools javascript to create a slider with navigation buttons and text with links, then on to configuring JQuery UI for CMS desk editable tabs populated with articles. Stay tuned!

The Web part I chose for this task was the Scrolling Text Web part. That may sound confusing, since there are graphics in this configuration. The reason I chose this over the image slider was to have easily editable text. It is possible to configure this control to any size you want, so all I had to work out was getting the photo image and the action button in. I configured the Web part to show the Document type CMSArticle, the reasons for that will become apparent. I knew what size the container had to be so I wrote a Custom Transformation which I named CMS.Article.ScrollingPreview and a Web part container which I named Banner
Slider.
I took a look at the code for the default Article transformation:
<h1>
<%# Eval("ArticleName") %> </h1>
<%# IfEmpty(Eval("ArticleTeaserImage"), "", "![]() ") %>
<%# Eval("ArticleText") %>
") %>
<%# Eval("ArticleText") %>
Then in the CMS Site Manager I built the new one:
<div style="background: #fff url(<%# GetFileUrl("ArticleTeaserImage") %>) top left no-repeat; height:250px; width:565px;">
<div class="scrollingpreviewtxt">
<h2>
<%# Eval("ArticleName") %></h2>
<p class="content"><%# Eval("ArticleTeaserText") %></p>
</div>
<div class="buttonimg">
<%# Eval("ArticleText") %>
</div>
</div>
As you can see to get the photo graphic in I use an outer div with a background image which I pulled as the Article Teaser Image. I used inline style for this so that I could put the macro in the style - I wasn't sure this would work, but it did. Now the user can edit the image. Of course I had to build special images with white space for the text to fall on to with a nice fade effect. Next comes an inner div to hold the title and text, all of which get their styling from the CSS already in place. The CSS for the transformation is:
/*#Transformations/Scrolling Preview#*/

.scrollingpreviewtxt /*inner div to hold the text*/
{
width:240px;
height: 220px;
padding-left: 20px;
}

.buttonimg /*the button*/
{
position:relative;
bottom:10px;
left: 435px;
width: 85px;
height: 30px;
background:transparent url(/App_Themes/liveair/images/reg_button.png) top left no-repeat;
padding-top: 7px;
margin:0;
float:left;
text-align:center;
font-size: 12px;
font-weight: bold;
}

.buttonimg a, .buttonimg a:hover /*needed to add this to the button hover - it inherited the rest*/
{
font-weight: bold;
}
One sneaky thing I did was using the Teaser text of the Article for the text in the body of the slide and the
Article text for the text in the button, wrapping it in the buttonimg div to make it an action button. Now the
client has a slider that they can edit the text, image and button text on from an easy form interface and easily
add slides from the CMS desk. How cool is that!

To hold it in place and give it a border a simple Web part container containing this div id:
#photobox
{
position:relative;
top: 0;
left: 20px;
width: 565px;
height:250px;
margin: 0;
background:#eeeeee;
border: 2px #cccccc outset;
padding: 0;
float: left;
clear:both;
}
All set!
Later I will do a post on a "hybrid" control using the native Kentico repeater wrapped in some Mootools javascript to create a slider with navigation buttons and text with links, then on to configuring JQuery UI for CMS desk editable tabs populated with articles. Stay tuned!
Thursday, April 30, 2009
TWO GREAT UTILITIES FOR WEB BUILDERS - PT 1
I have previously outlined my general workflow for designing and building websites. I take a pretty "hands-on" approach. This being said I would like to share a couple of powerful utilities that I use on every web project and have found to be invaluable in terms of saving time and keeping the quality of my work high. Both are available in both free and commercial versions. I think knowledge of these could benefit anyone involved in building and/or maintaining websites.
Irfanview - The Great Little Image Utility With the Funny Name
The first tool addresses the issue of image management. The scenario I will address as an example is this one. You have your design, the client gives you a disk or sends you several emails of various pictures to use, usually full size digital camera or scanned images. Now comes the task of re-sizing and optimizing these images to work in the website. If there are a large number of images involved, this is a time consuming and repetitive job that I hate to bill to my clients at full rate. There area number of shortcuts, but they usually yield less than optimal quality and dependability. The solution? Irfanview (pronounced ear-fan-view). The powerful little program with the funny name. Below is a list of some of Irfanviews many functions.
* Many supported file formats (the list is too long to include here.)
* Multi language support
* Thumbnail/preview option
* Paint option - to draw lines, circles, arrows, straighten image etc.
* Toolbar skins option
* Slideshow (save slideshow as EXE/SCR or burn it to CD)
* Show EXIF/IPTC/Comment text in Slideshow/Fullscreen etc.
* Support for Adobe Photoshop Filters
* Fast directory view (moving through directory)
* Batch conversion (with image processing)
* Multipage TIF editing
* File search
* Email option
* Multimedia player
* Print option
* Support for embedded color profiles in JPG/TIF
* Change color depth
* Scan (batch scan) support
* Cut/crop
* IPTC editing
* Effects (Sharpen, Blur, Adobe 8BF, Filter Factory, Filters Unlimited, etc.)
* Capturing
* Extract icons from EXE/DLL/ICLs
* Lossless JPG rotation
* Unicode support
* Many hotkeys
* Many command line options
* Many PlugIns
* Only one EXE-File, no DLLs, no Shareware messages like "I Agree" or "Evaluation expired"
* No registry changes without user action/permission!
* and much much more
To be honest I have never found the time to explore all of Irfanview's capabilities,but the ones I have tried worked well. Today I will be discussing using batch processing to take the clients picture files and convert them to use in a website. I create a directory, usually with 'websize' in the name and then open Irfanview. When you first open Irfanview you are presented with a simple user interface, with a screen for single images or movies.

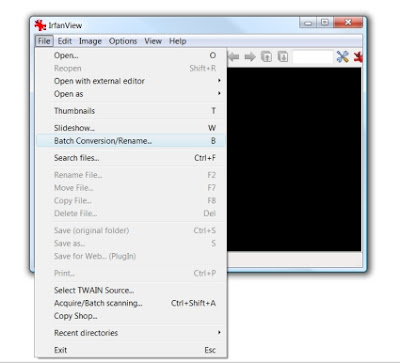
On the file tab in the menu, you select 'Batch Conversion/Rename' or you can just press the B key on your keyboard. You will be presented with the dialog shown below.
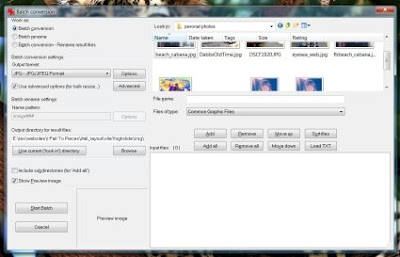
Choose a Function - In the top left corner of the dialog you select the function you want to perform. A batch conversion will convert files to a specified format and will also perform other functions in the process; such as resize, optimize, sharpen,watermark, etc. More on that in a moment. Batch rename can rename a group of files and allows the setting of a naming pattern and the ability to serialize the names. This can be handy for making groups of images you use conform to your own naming conventions without having to keep track of doing individual files. It is also real handy for loading gallery applications that load using file names/directories. The last of the three choices combines the first two functions.
Choose Your Files and Output Directory - On the right side of the dialog is where you can navigate to the working directory and choose the files you wish to work on. You can do the selecting and sorting in this dialog or you can just open a folder and select and drag and drop the files you want to work with into the bottom left box on the dialog. To preview files you have added in the box, just select a file and it will appear in the image preview box on the left if you have the Show Preview image box checked. Or you can just press the P key on your keyboard. In this interface you can also move the files around or autosort them by different parameters to get them in order for serializing. By default Irfanview works from top to bottom.
Conversion Settings - On the left, under 'Batch conversion settings' you can set the Output format using the dropdown. Once you have selected your format you can click on the 'Options' button and you will be presented with choices specific to that format (jpeg/gif options shown below).
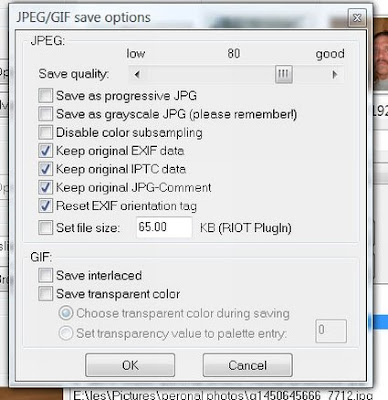
One of the coolest things here is the ability to set the filesize, using the RIOT plugin and the optimization is set automatically. To add other functions to your you click on the 'Advanced' button below the 'Options' button and you will be presented with the dialog shown below.
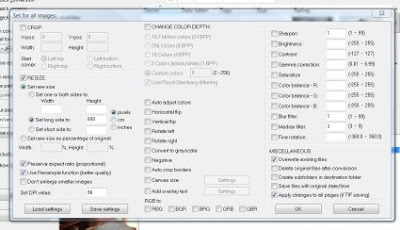
This is where the true power of Irfanview starts to show. You have a variety of options for setting resizing, cropping and resolution as well as make tweaks to the pictures. Usually I just use the resizing function, but the quality of adjustments made using this tool are quite high, of pro caliber (see the bottom of this article). When using settings here, pay particular attention to the MISCELLANEOUS choices in the bottom right corner. This controls overwrites and directory writing. You also have an option on the bottom left of this dialog to save settings (as and INI file) and to load settings you have previously saved. Another great time saver!
If you have selected a rename option in the 'Work as' section that will activate the 'Batch rename settings input. You can enter a name and then click on the options button which will show you the various settings you have available. It is all pretty self explanatory. One of my favorite features here is the ability to replace text in a file name - handy for versioning. Other than that, on the file management side, I usually have created a directory for the output and select Copy original/input files to output directory. I imagine most people would make the choice to keep the originals.
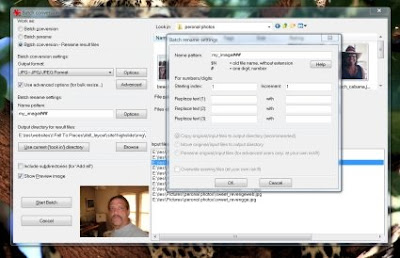
This brings us to the final choice in this flow, selecting the output directory. You can choose to input a directory manually (who does that anymore?), use the current directory (default),or Browse to choose your output directory.
With your images all loaded and sorted and all of your output options and your output directory select you are now ready to go. "Start Batch" or the S key on your keyboard and watch Irfanview work. The first time you do this you will be amazed at how fast it is. It reports its output as it goes and lists whether each conversion went okay and it gives a a little summary of files, errors and warnings at the end.

That is basic file conversion on Irfanview. I have used this utility for years and is has saved me untold man hours in putting together web projects. I also do photography and use it for renaming and optimizing proofs, renaming files for submission to editors and other task. As I mentioned before, Irfanview is free for non-commercial use and a license for commercial use is currently only USD $12.00, quite a bargain and well worth it to support Irfan Skiljan in his efforts to continue enhancements and improvements. This utility works on all current versions of windows, even 64 bit Vista. You can obtain Irfanview at http://www.irfanview.com/ .
Example: I have posted a couple of images for you to compare. The first if for the original image, a web image at 114 kb and the second is the same image, resized and optimized with Irfanview to 51k. You can view them in different tabs on your browser to compare or download them for comparison. This will give you and idea of the quality you can get with Irfanview.
Original
Optimized
Irfanview - The Great Little Image Utility With the Funny Name
The first tool addresses the issue of image management. The scenario I will address as an example is this one. You have your design, the client gives you a disk or sends you several emails of various pictures to use, usually full size digital camera or scanned images. Now comes the task of re-sizing and optimizing these images to work in the website. If there are a large number of images involved, this is a time consuming and repetitive job that I hate to bill to my clients at full rate. There area number of shortcuts, but they usually yield less than optimal quality and dependability. The solution? Irfanview (pronounced ear-fan-view). The powerful little program with the funny name. Below is a list of some of Irfanviews many functions.
* Many supported file formats (the list is too long to include here.)
* Multi language support
* Thumbnail/preview option
* Paint option - to draw lines, circles, arrows, straighten image etc.
* Toolbar skins option
* Slideshow (save slideshow as EXE/SCR or burn it to CD)
* Show EXIF/IPTC/Comment text in Slideshow/Fullscreen etc.
* Support for Adobe Photoshop Filters
* Fast directory view (moving through directory)
* Batch conversion (with image processing)
* Multipage TIF editing
* File search
* Email option
* Multimedia player
* Print option
* Support for embedded color profiles in JPG/TIF
* Change color depth
* Scan (batch scan) support
* Cut/crop
* IPTC editing
* Effects (Sharpen, Blur, Adobe 8BF, Filter Factory, Filters Unlimited, etc.)
* Capturing
* Extract icons from EXE/DLL/ICLs
* Lossless JPG rotation
* Unicode support
* Many hotkeys
* Many command line options
* Many PlugIns
* Only one EXE-File, no DLLs, no Shareware messages like "I Agree" or "Evaluation expired"
* No registry changes without user action/permission!
* and much much more
To be honest I have never found the time to explore all of Irfanview's capabilities,but the ones I have tried worked well. Today I will be discussing using batch processing to take the clients picture files and convert them to use in a website. I create a directory, usually with 'websize' in the name and then open Irfanview. When you first open Irfanview you are presented with a simple user interface, with a screen for single images or movies.


On the file tab in the menu, you select 'Batch Conversion/Rename' or you can just press the B key on your keyboard. You will be presented with the dialog shown below.

Choose Your Files and Output Directory - On the right side of the dialog is where you can navigate to the working directory and choose the files you wish to work on. You can do the selecting and sorting in this dialog or you can just open a folder and select and drag and drop the files you want to work with into the bottom left box on the dialog. To preview files you have added in the box, just select a file and it will appear in the image preview box on the left if you have the Show Preview image box checked. Or you can just press the P key on your keyboard. In this interface you can also move the files around or autosort them by different parameters to get them in order for serializing. By default Irfanview works from top to bottom.
Conversion Settings - On the left, under 'Batch conversion settings' you can set the Output format using the dropdown. Once you have selected your format you can click on the 'Options' button and you will be presented with choices specific to that format (jpeg/gif options shown below).


If you have selected a rename option in the 'Work as' section that will activate the 'Batch rename settings input. You can enter a name and then click on the options button which will show you the various settings you have available. It is all pretty self explanatory. One of my favorite features here is the ability to replace text in a file name - handy for versioning. Other than that, on the file management side, I usually have created a directory for the output and select Copy original/input files to output directory. I imagine most people would make the choice to keep the originals.

This brings us to the final choice in this flow, selecting the output directory. You can choose to input a directory manually (who does that anymore?), use the current directory (default),or Browse to choose your output directory.
With your images all loaded and sorted and all of your output options and your output directory select you are now ready to go. "Start Batch" or the S key on your keyboard and watch Irfanview work. The first time you do this you will be amazed at how fast it is. It reports its output as it goes and lists whether each conversion went okay and it gives a a little summary of files, errors and warnings at the end.

That is basic file conversion on Irfanview. I have used this utility for years and is has saved me untold man hours in putting together web projects. I also do photography and use it for renaming and optimizing proofs, renaming files for submission to editors and other task. As I mentioned before, Irfanview is free for non-commercial use and a license for commercial use is currently only USD $12.00, quite a bargain and well worth it to support Irfan Skiljan in his efforts to continue enhancements and improvements. This utility works on all current versions of windows, even 64 bit Vista. You can obtain Irfanview at http://www.irfanview.com/ .
Example: I have posted a couple of images for you to compare. The first if for the original image, a web image at 114 kb and the second is the same image, resized and optimized with Irfanview to 51k. You can view them in different tabs on your browser to compare or download them for comparison. This will give you and idea of the quality you can get with Irfanview.
Original
Optimized
Sunday, March 1, 2009
My Kentico Design Workflow - An Overview
I am going to do a quick walk-through of the workflow I use with Kentico,a commercial ASP.NET CMS application. I am primarily a designer, I work with programmers who handle the details of customizing code so the majority of my work is on the look and feel of the UI and the sites. So this will be a designer's view of working with Kentico. For years I have typically built sites with Adobe Photoshop and a text editor. I don't happen to be a big fan of Dreamweaver, but for the last year or so I have done a fair bit of work in Visual Studio 2008.
If you have not worked with Kentico before I would encourage you to download the trial version, you can also get a free license with limited features, though the limits are slight, you might want to get a look at the full feature set. When you install the application there are two very thorough pdf tutorials right in the application directory to get you started. There is also very complete documentation online. The two tutorials will get you through installation and the creation and editing of the site. There are two development paths you can take with Kentico. Portal engine development and ASPX pages development. The workflow I will be discussing is using the portal engine, which is very powerful and flexible, allowing custom CSS and page code, macros and custom macros and even the use of custom webparts and webpart containers.
My usual workflow starts with meeting with the client and discussing the website as a whole, its goals and functions. I take notes and draw sketches on paper during the meetings. I also get the client to supply me with any graphic element files they may have that will be incorporated into the site, such as logos, photos, text copy, etc.. When I think I have enough to go on I sketch up the pages in Adobe Photoshop and do a little back and forth with the client on the design, usually sending png files via email.
After finalizing most of the design decisions and getting a go ahead from the client I take the psd sketches and my favorite text editor, Textpad, and I write the CSS and test the pages in HTML, generating the graphic elements out of the psd file as I go. I check the pages in different browsers to check the CSS. This may seem rather cumbersome to many of you, but I have found that checking my code decisions like this saves a lot of hair pulling later. It also helps me make sure I have all the graphic elements rendered correctly. As an added bonus I get to look at the design in a browser and have the client look at it in a browser, which makes it seem more real to them than the png sketches and I often find little visual tweaks that I can do to make the browser experience better.
As I am writing the CSS and the HTML I comment liberally with Kentico in mind, noting the CSS I will use for webpart containers, where the page place holder and webpart zones will go in the HTML. I also note what goes on the master page and what subordinates to content.
When these bits are done and tested and the client likes where it is going I am ready to load it in to Kentico. There are some choices here, I have done it all different ways depending on the extent of the site and my time frame.
One can develop the site locally using IIs in localhost,or the built-in server in Visual Studio or Visual Web Developer. For the first choice you must have SQL Express installed on your computer for the database. Another choice is to install the pages locally with the web.config pointing to a database on a server. All you have to do to make this work is open up a local install and when you get the install dialog put in the connection information for your remote database. Kentico will write the connection information into the web.config as part of the install process. Then you can work on the site locally, make adjustments to the code when necessary without having to upload the files to test them and when you are done you just upload the files to the server and go live! This last path is a good choice if you plan to pre-compile the site using Visual Studio for better performance and security. There is detailed information on this in the Kentico documentation.
When you develop the site completely on your local box using a local database and you are ready install it on to your server you just do an export of the site, Kentico handles that and zips it up into the export folder in the site utilities folder. Then you install Kentico on the server, setting up the database in the process and upload the export file and import your site into Kentico. It unzips the file, imports all the database objects and sets up the site.
By the way,I found that no matter which route you go, making regular exports of the site as you go along is the best way to back up your work. That way, if something goes terribly wrong you can easily regain you work. It has saved me more than once! It will even save you if you have to scrap your database and start over (yes it's happened to me).
Back to getting the design in to Kentico. When it first starts up it will take you through a site creation wizard. I usually choose a new blank site for the portal engine. As you go through the wizard you can create your initial site structure by creating some blank pages. I usually skip this step and wait until I open it up in the CMS desk. A little tip here, if you should somehow goof with the license and get the message that tells you this you can always access the application by typing http://URLofthesite/sitemanager in the browser to get in to the Site Manager where you can fix these things.
Once I have the install going that I will be working on I make sure to create a folder for the site in the App_Themes directory and upload my page graphics into an images folder there. I use the naming convention of having my site App_Themes folder and CSS stylesheet all have the same name. The next thing is to open up the site in the CMS desk and switch to the CMS Site Manager. I go to the development tab and select CSS stylesheets from the application tree. I create a new stylesheet. I cut and paste my CSS to the stylesheet and save it. I edit the paths to images in the CSS so that they will show up. For images in the App_Themes folder this will follow the format - ./App_Themes/foldername/images/filename. Later I will come back and bookmark sections of the CSS in the CSS editor for easy editing (another cool function of Kentico). After that I return to the CMS desk and and go to the Root in the site tree (the desk generally lands there by default) and begin editing my page. In the portal engine and CMS desk there will be a master page tab when I am on the root node of the site in the site tree (left hand column in the CMS desk). Here is where I take the HTML I generated earlier and cut and paste it in to the Master Page around the content placeholder which will place the content on the pages. I adjust the path of any images placed with HTML. The path from the page follows this format - ~/App_Themes/foldername/images/filename .
Next I start on my home page. When I open it up in the page tab of the CMS desk I will see an empty master page. I switch to the design tab where I will see the location of the page template which is a green bar usually near the top indicating the content where the content placeholder has placed it. You can control the page template used by each page in the properties tab. I usually just use a page template called simple and then I open the template and start editing, again cutting and pasting code and also putting in webpart zones using the simple asp.net markup described in the documentation.
Editing in the Design tab is not completely WYSIWYG but you can switch back and forth between the page tab or even the live site tab to check you work as you go. I have a dual monitor setup and will often just open the site in another browser instance and check it by refreshing as I edit. Don't forget to save before leaving a tab!
The process moves along fairly quickly from here on out. I go through the pages and cut and paste code. I create documents for the various webpart controllers and create the webpart containers I use for the layout. I can create custom transformations to make the controllers look and act as I want them to. In the editable regions I put in some initial content, usually cutting and pasting from documents my client has given me. You can even cut and paste from word docs and the editor will clean it up. I am currently learning about the macros a very powerful feature of Kentico and using that a bit. Generally, from the time I start the install until I have the pages and structure set up for a complete site is an hour or two if I add much content. This is where all the work I did before pays off. I can just concentrate on the Kentico functions without having to fuss about the design. I occasionally have to adjust some margins if I have put something in a webpart zone to replace a div, but other than that it translates in a pretty straightforward manner.
Before long the site is done and I do a delivery meeting with the client. If they are going to be maintaining the content themselves I supply them with a copy of the Kentico CMS Users Guide pdf and give them a little training session walking them through all the different parts and functions of their site. So far, my clients have loved Kentico and I haven't gotten lots of phone calls saying "help me I can't make this work" which tells me Kentico is quite user friendly.
As I said earlier this is just a quick overview of how I personally work with Kentico. I am relatively new to Kentico, but it has worked so well that I try to use it on any project I can. I feel it is a very powerful and robust application. I would love to hear from other developers out there who are working with or who have tried Kentico, to know their various experiences and ideas.
Subscribe to:
Posts (Atom)

